🔩
Mod Developer
DeveloperModder
  • 👋Welcome!
  • Support
    • Dashboard
    • 📄Dictionary
    • 📘Glossary
      • ▫️Files
        • ▫️Assets
          • ▫️Appendix
        • ▫️Red4 Shaders
          • ▫️Definitions
          • ▫️Descriptions
      • ▫️In-Game Objects
        • ▫️Building
        • ▫️Character
          • ▫️Hair
        • ▫️Clothes
          • ▫️Variants
        • ▫️Environment
        • ▫️Vehicle
          • ▫️Assests
            • ▫️Appearance Mapping
          • ▫️TweakDB
        • ▫️Weapon
    • 🐣Getting Started
      • ▫️1. Setup
      • ▫️2. Download
      • ▫️3. Configure
    • 👪Community Links
    • 🔨Troubleshooting
      • ❔FAQ
      • ❗Problems
  • Documentation
    • Dashboard
    • Generalized guidees
      • Replace a player item with an NPC item
      • Mesh editing
      • Remove an Animation (and Potentially Replace It)
      • Change Position and Rotation of an entMeshComponent
      • PagEdit Voiceover and Subtitles In a Quest
      • Recoloring items
      • Creating new items (adding to the game)
    • 🎨Graphical Editors
      • 🦮General Guides
      • 📄General References
      • ▫️Adobe Substance
      • ▫️Autodesk Maya
      • ▫️Blender
      • ▫️Gimp
      • ▫️Krita
      • ▫️Photoshop
    • 🧑‍💻Modding Tools
      • ▫️Cyberpunk Engine Tweaks
        • 🦮Guides
          • ▫️Installing
            • ▫️Troubleshooting
            • ▫️Proton
          • ▫️Usage
          • ▫️Scripts
          • VS Code
        • 📄Reference Sheets
          • ▫️Config File
          • ▫️Font & font size
          • ▫️Uninstalling
          • ▫️UI Examples
      • ▫️MLSETUP Builder
        • 🦮Guides
        • 📄Reference Sheets
      • ▫️REDmod
        • 🦮Guides
        • 📄Reference Sheets
          • ▫️Commands
            • ▫️Deploy
            • ▫️Import
          • ▫️Usage
          • ▫️Structure
      • ▫️Redscript
        • 🦮Guides
          • Get Started
            • Download
            • REDscript in 2 minutes
        • 📄Reference Sheets
          • Language Features
            • Intrinsics
            • String formatting
            • Loops
      • ▫️Red4ext
        • 🦮Guides
          • ▫️Get Started
            • Installing RED4ext
            • Installing a Plugin
            • Configuration
            • Uninstalling
          • ▫️Creating a Plugin
          • ▫️Creating a Custom Native Class
            • Adding a Native Function
        • 📄Reference Sheets
      • ▫️TweakDB
        • ▫️TweakXL
          • 📄Reference Sheets
        • ▫️ArchiveXL
          • 📄Reference Sheets
        • 🦮Guides
      • ▫️WolvenKit
        • 🦮Guides
          • ▫️Getting Started
            • ▫️Download
            • ▫️Setup
            • ▫️Install
            • ▫️Uninstall
            • ▫️Create a mod
          • ▫️Custom Photo Mode Expressions
        • 📄Reference Sheets
          • ▫️Overview
          • ▫️Editor
            • ▫️Project Explorer
            • ▫️Properties
            • ▫️Asset Browser
          • ▫️Release Notes
      • ▫️WolvenKit.CLI
        • 🦮Guides
        • 📄Reference Sheets
    • ⚙️Utilities
      • ▫️010 Editor
        • 🦮Guides
        • 📄Reference Sheets
      • ▫️3DS
        • 🦮Guides
        • 📄Reference Sheets
      • ▫️Deep Asset Discovery
        • 🦮Guides
        • 📄Reference Sheets
      • ▫️Noesis
        • 🦮Guides
        • 📄Reference Sheets
      • ▫️Notepad++
        • 🦮Guides
        • 📄Reference Sheets
      • ▫️PixelRick's Save Editor
        • 🦮Guides
        • 📄Reference Sheets
  • Collaboration
    • Dashboard
    • 🤝Get Involved
      • Needed Documentation
      • Wanted Ads
    • 📅Meetings
Powered by GitBook
On this page
  1. Documentation
  2. Modding Tools
  3. WolvenKit
  4. Guides

Custom Photo Mode Expressions

PreviousCreate a modNextReference Sheets

Last updated 2 years ago

(Thanks to glory-ride for showing me how to do this <3) This tutorial will teach you how to create your own photo mode expression mod by making your selection from an NPC's.

Contents

  • ​​

  • ​​

  • ​​

  • ​​

Step 1: Locate the right file

female

base\animations\ui\photomode\photomode_female_facial.anims

male

base\animations\ui\photomode\photomode_male_facial.anims

Step 2: Replace the file with the one you want

NPC animation files live underbase\animations\facial\and end in .anims. You can pick any of them, regardless of gender.Replace the player file with the one you've selected.Example:Copy base\animations\facial\main_characters\rogue\rogue_facial_idle_poses.anims to base\animations\ui\photomode\photomode_female_facial.anims

Step 3: Pick the expressions you want

You can select a total of 12 expressions from the NPC's anim file. You do this by changing their names to the ones the photo mode will look for (in scroll order):

  1. 1.facial_neutral

  2. 2.facial_charming

  3. 3.facial_furious

  4. 4.facial_bored

  5. 5.facial_pissed

  6. 6.facial_pleased

  7. 7.facial_disgusted

  8. 8.facial_happy

  9. 9.facial_scared

  10. 10.facial_surprised

  11. 11.facial_sadness

  12. 12.facial_whistling

Do this by opening the file (photomode_female_facial.anims or photomode_male_facial.anims that you replaced with the NPC of your choice) in WolvenKit (or 010 if you know how to use it). Find the animation you want to use* and change its name.
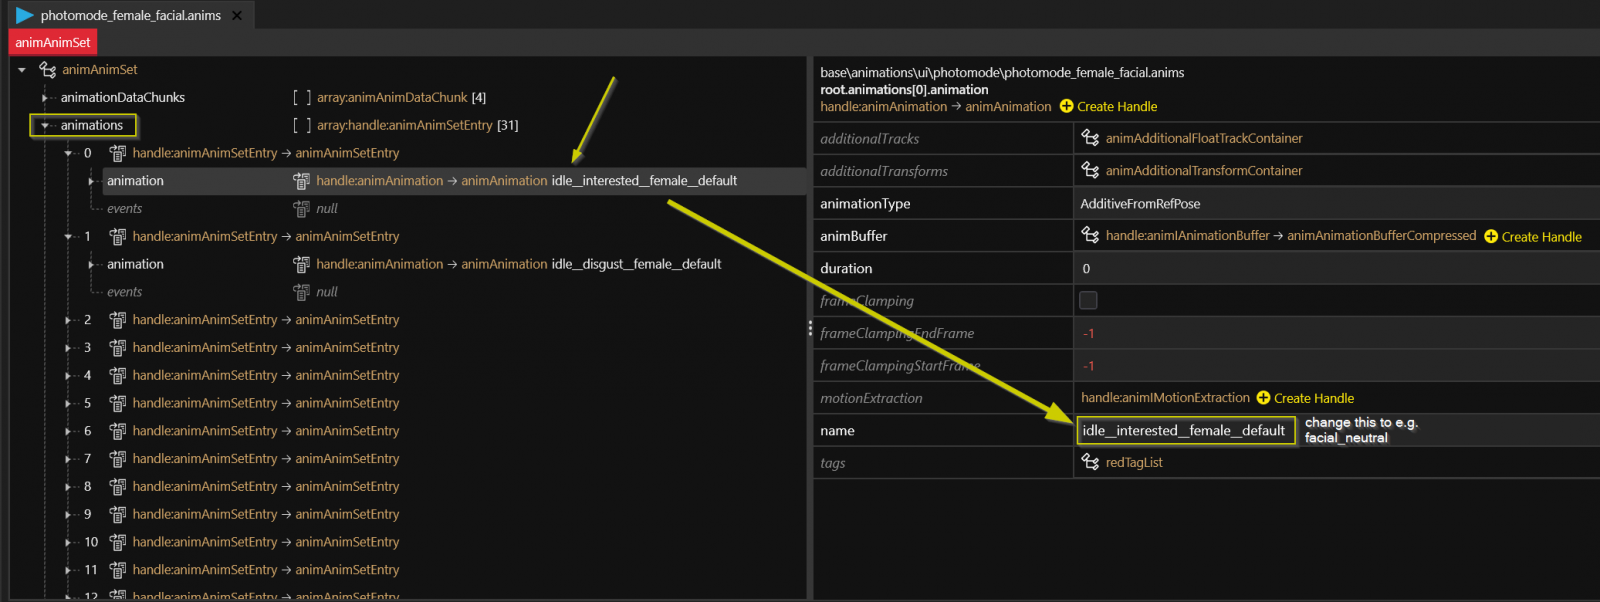
Rinse and repeat until you're done.Save the file, pack the project, and start the game - voila, you now have custom expressions.* As for which expressions you want to use, you'll have to try them one by one. The reference section contains pictures that I made for myself, feel free to add to them!

References

​​​​​​​​​​​​

🧑‍💻
▫️
🦮
▫️
1 Step 1: Locate the right file
2 Step 2: Replace the file with the one you want
3 Step 3: Pick the expressions you want
4 References
photomode_johnny_facial
johnny__facial_idle_poses
rogue_facial_idle_poses
evelyn_facial_idle_poses
generic_average_female_facial_idle_poses
panam_facial_idle_poses