🔩
Mod Developer
DeveloperModder
  • 👋Welcome!
  • Support
    • Dashboard
    • 📄Dictionary
    • 📘Glossary
      • ▫️Files
        • ▫️Assets
          • ▫️Appendix
        • ▫️Red4 Shaders
          • ▫️Definitions
          • ▫️Descriptions
      • ▫️In-Game Objects
        • ▫️Building
        • ▫️Character
          • ▫️Hair
        • ▫️Clothes
          • ▫️Variants
        • ▫️Environment
        • ▫️Vehicle
          • ▫️Assests
            • ▫️Appearance Mapping
          • ▫️TweakDB
        • ▫️Weapon
    • 🐣Getting Started
      • ▫️1. Setup
      • ▫️2. Download
      • ▫️3. Configure
    • 👪Community Links
    • 🔨Troubleshooting
      • ❔FAQ
      • ❗Problems
  • Documentation
    • Dashboard
    • Generalized guidees
      • Replace a player item with an NPC item
      • Mesh editing
      • Remove an Animation (and Potentially Replace It)
      • Change Position and Rotation of an entMeshComponent
      • PagEdit Voiceover and Subtitles In a Quest
      • Recoloring items
      • Creating new items (adding to the game)
    • 🎨Graphical Editors
      • 🦮General Guides
      • 📄General References
      • ▫️Adobe Substance
      • ▫️Autodesk Maya
      • ▫️Blender
      • ▫️Gimp
      • ▫️Krita
      • ▫️Photoshop
    • 🧑‍💻Modding Tools
      • ▫️Cyberpunk Engine Tweaks
        • 🦮Guides
          • ▫️Installing
            • ▫️Troubleshooting
            • ▫️Proton
          • ▫️Usage
          • ▫️Scripts
          • VS Code
        • 📄Reference Sheets
          • ▫️Config File
          • ▫️Font & font size
          • ▫️Uninstalling
          • ▫️UI Examples
      • ▫️MLSETUP Builder
        • 🦮Guides
        • 📄Reference Sheets
      • ▫️REDmod
        • 🦮Guides
        • 📄Reference Sheets
          • ▫️Commands
            • ▫️Deploy
            • ▫️Import
          • ▫️Usage
          • ▫️Structure
      • ▫️Redscript
        • 🦮Guides
          • Get Started
            • Download
            • REDscript in 2 minutes
        • 📄Reference Sheets
          • Language Features
            • Intrinsics
            • String formatting
            • Loops
      • ▫️Red4ext
        • 🦮Guides
          • ▫️Get Started
            • Installing RED4ext
            • Installing a Plugin
            • Configuration
            • Uninstalling
          • ▫️Creating a Plugin
          • ▫️Creating a Custom Native Class
            • Adding a Native Function
        • 📄Reference Sheets
      • ▫️TweakDB
        • ▫️TweakXL
          • 📄Reference Sheets
        • ▫️ArchiveXL
          • 📄Reference Sheets
        • 🦮Guides
      • ▫️WolvenKit
        • 🦮Guides
          • ▫️Getting Started
            • ▫️Download
            • ▫️Setup
            • ▫️Install
            • ▫️Uninstall
            • ▫️Create a mod
          • ▫️Custom Photo Mode Expressions
        • 📄Reference Sheets
          • ▫️Overview
          • ▫️Editor
            • ▫️Project Explorer
            • ▫️Properties
            • ▫️Asset Browser
          • ▫️Release Notes
      • ▫️WolvenKit.CLI
        • 🦮Guides
        • 📄Reference Sheets
    • ⚙️Utilities
      • ▫️010 Editor
        • 🦮Guides
        • 📄Reference Sheets
      • ▫️3DS
        • 🦮Guides
        • 📄Reference Sheets
      • ▫️Deep Asset Discovery
        • 🦮Guides
        • 📄Reference Sheets
      • ▫️Noesis
        • 🦮Guides
        • 📄Reference Sheets
      • ▫️Notepad++
        • 🦮Guides
        • 📄Reference Sheets
      • ▫️PixelRick's Save Editor
        • 🦮Guides
        • 📄Reference Sheets
  • Collaboration
    • Dashboard
    • 🤝Get Involved
      • Needed Documentation
      • Wanted Ads
    • 📅Meetings
Powered by GitBook
On this page
  • Step 1: Replace the mesh
  • Step 2: Change the .mlsetups
  • Step 3: Success!
  1. Documentation
  2. Generalized guidees

Replace a player item with an NPC item

PreviousGeneralized guideesNextMesh editing

Last updated 2 years ago

Summary

Created by @manavortex Published November 05 2022​This tutorial will teach you how to switch a player mesh for an NPC garment and map its variants to the existing colours.We'll assume that you know how to edit mesh appearances. If you don't, check the .

Step 1: Replace the mesh

Find the mesh that you want to use ("target mesh") and replace it with the one that you want to switch in ("source mesh").Example: Replacing the short-sleeved poser jacket with the monk shirt with the tied-back sleeves.​
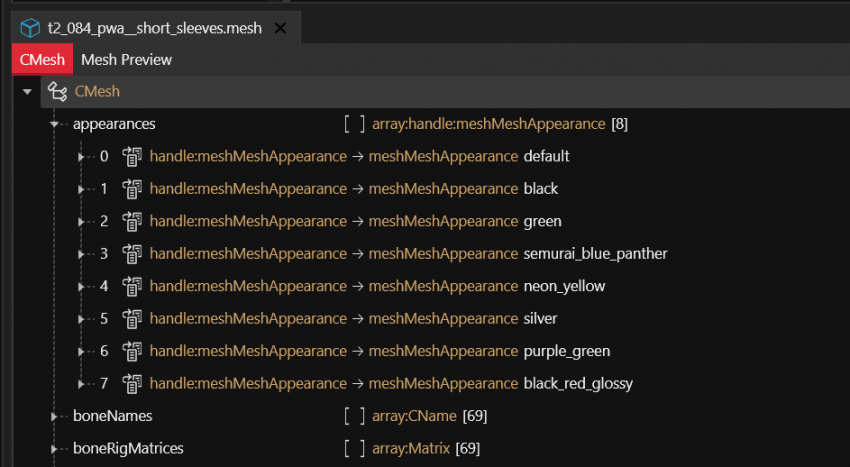
target mesh

base\characters\garment\player_equipment\torso\t2_084_jacket__short_sleeves\t2_084_pwa__short_sleeves.mesh

source mesh

base\characters\garment\gang_monk\torso\t2_135_jacket__monk_shirt\t2_135_wa_jacket__monk_shirt.mesh

  1. 1.Find both files and add them to your project.

  2. 2.Move the source mesh to the target mesh's folder.

  3. 3.Rename the target mesh (e.g. "t2_084_pwa__short_sleeves.mesh" -> "original.mesh").

  4. 4.Rename the source mesh to the target mesh (e.g. "t2_135_wa_jacket__monk_shirt.mesh" -> "t2_084_pwa__short_sleeves.mesh")

  5. 5.Open both meshes in WolvenKit

Target (original) mesh and its variants

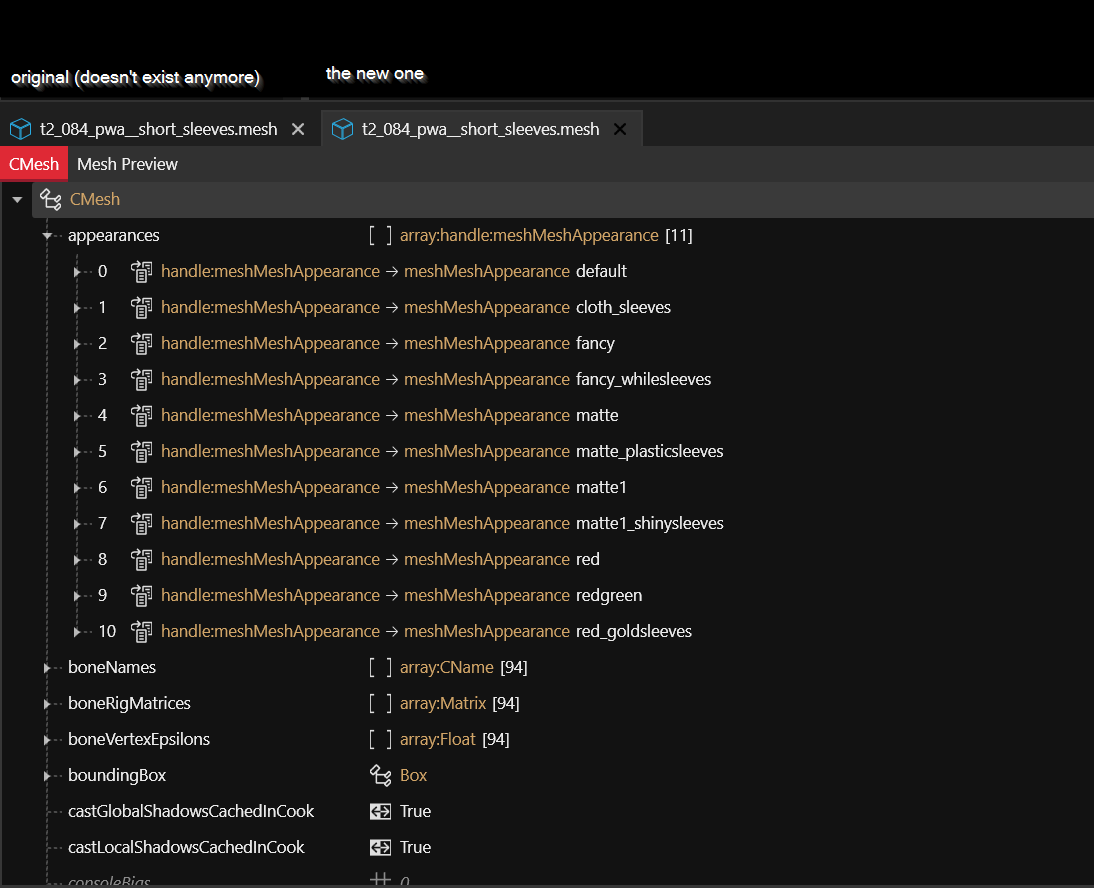
Source (new) mesh and its variants

Step 2: Change the .mlsetups

Now comes the annoying part: we need to find out which spawn code corresponds to which meshMeshAppearance. The process is a little tedious.​​

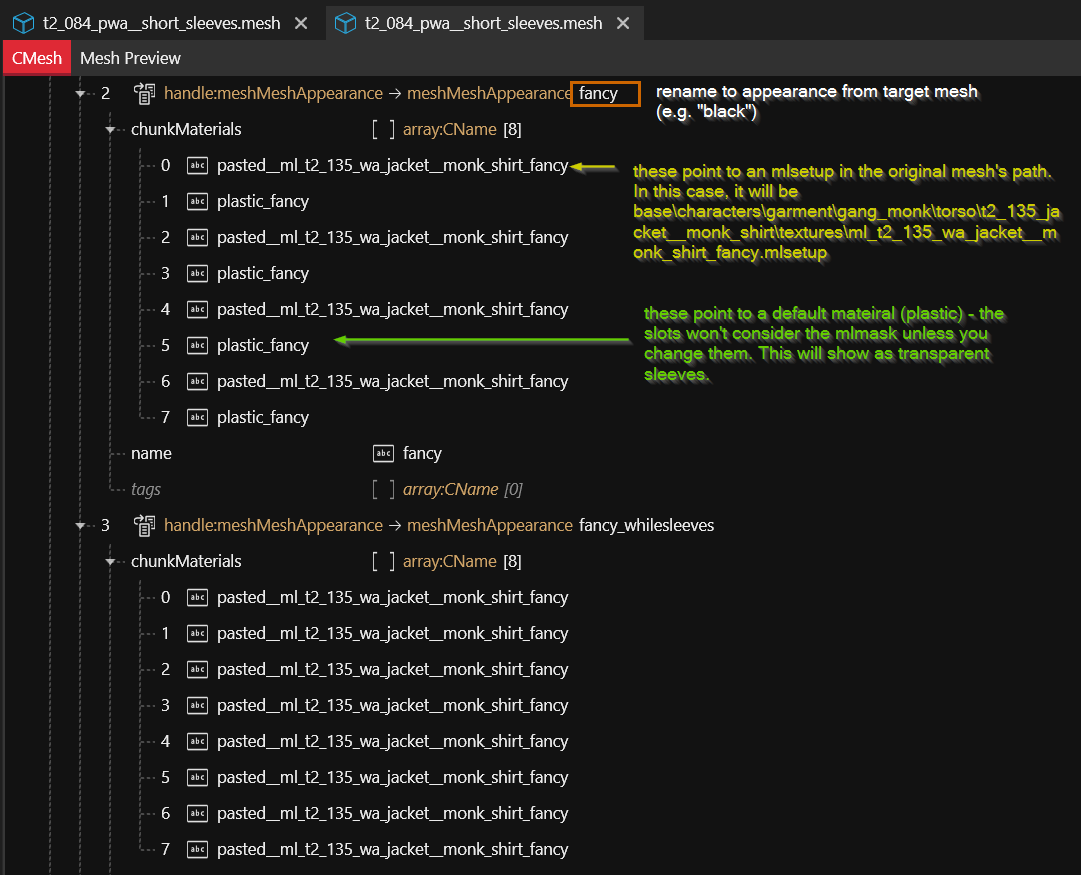
For example, the appearance "black" with the chunks pointing at pasted_ml_t2_135_wa_jacket__monk_shirt_fancy will look for:

yes

archive\base\characters\garment\gang_monk\torso\t2_135_jacket__monk_shirt\textures\ml_t2_135_wa_jacket__monk_shirt_fancy.mlsetup

no

base\characters\garment\player_equipment\torso\t2_084_jacket__short_sleeves\textures\ml_t2_135_wa_jacket__monk_shirt_fancy.mlsetup

Don't ask me how the lookup/naming works, I have no idea. Just copy it from the source mesh.The names of the meshMeshAppearance need to be taken from the target mesh - when spawning an item, the game will look for the variant "black", since that's mapped to the corresponding item code. The values in the chunkMaterials belong to the source mesh.Rename all the variants in the source mesh with those from the target mesh. Then, make sure that you can tell them apart (e.g. by giving each variant an individual appearance or colouring the mlmasks. What worked for me was using primary colours on the mlmasks, and then using each of them fully or with plastic sleeves. Your mileage may vary.)

Step 3: Success!

Enjoy!Cyberpunk 2077 Modding

After you've found out which spawn code corresponds to which appearance, you can now .

alter the appearance files
corresponding tutorial