> For the complete documentation index, see [llms.txt](https://solaartw.gitbook.io/developer/llms.txt). Markdown versions of documentation pages are available by appending `.md` to page URLs; this page is available as [Markdown](https://solaartw.gitbook.io/developer/documentation/generalized-guidees/recoloring-items.md).
# Recoloring items
Changing how an item looks in-game
### Summary
**Created by @manavortex Published November 05 2022**This guide will teach you how to change an item's appearance by editing its MultilayerSetup (\*.mlsetup file), how to rename materials, and how add your own mlsetups (**custompathing**).It uses the following versions:
* WolvenKit: [8.7.1-nightly.2022-11-06](https://github.com/WolvenKit/WolvenKit/compare/8.7.1-nightly.2022-11-05...8.7.1-nightly.2022-11-06) (but anything > 8.7 will do)
* [MLSetupBuilder](https://wiki.redmodding.org/cyberpunk-2077-modding/modding-know-how/modding-tools/mlsetup-builder): [1.6.5](https://github.com/Neurolinked/MlsetupBuilder) (older versions won't be compatible with WKit 8.7 and game version 1.6)
In general, an item's appearance is determined by a [mlsetup](https://wiki.redmodding.org/cyberpunk-2077-modding/developers/shaders/multilayered#what-is-the-mlsetup) file containing several material layers.Which of these layers affects which part of your mesh will be determined in the corresponding [mlmask](https://wiki.redmodding.org/cyberpunk-2077-modding/developers/shaders/multilayered#what-is-the-mlmask) file.
### **Step 1: Finding your item**
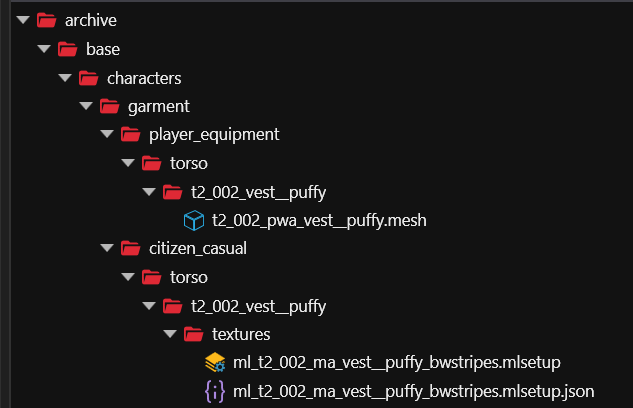
Before you can edit an item's appearance, you need to find the correct game file. To do this, you can consult the lists under "[Equipment](https://wiki.redmodding.org/cyberpunk-2077-modding/modding-know-how/references-lists-and-overviews/equipment)", or browse through the game's files.This tutorial will use the female variant of the puffy vest (as I've already [mapped and documented it](https://wiki.redmodding.org/cyberpunk-2077-modding/modding-know-how/references-lists-and-overviews/equipment/variants-and-appearances#reinforced-puffer-vest-4-variants)):base\characters\garment\player\_equipment\torso\t2\_002\_vest\_\_puffy\t2\_002\_pwa\_vest\_\_puffy.meshAdd the item to your project and open it in WolvenKit.
### Step 2: Finding the correct appearance
For a guide of how to trace your item's spawn code to the appearance, check [here](https://wiki.redmodding.org/cyberpunk-2077-modding/modding-know-how/references-lists-and-overviews/from-spawn-code-to-item).You will find the list with appearances at the very top of your mesh. We'll start by editing `bwstripes`, since we know that it is used by one of the variants :
find material bwstripes and remember the name of the chunkMaterial`chunkMaterials` corresponds to the `chunkMasks` (submeshes).default is the fallback appearance that'll be used if anything can't be resolved by name or index. This is the reason why most item swap mods give you only a single appearance - people didn't set up the [variants](https://wiki.redmodding.org/cyberpunk-2077-modding/modding-guides/changing-items/replace-a-player-item-with-an-npc-item).This vest has only one chunkMask, so there's only one material. Remember its name and find it here:
It's ml\_t2\_002\_ma\_vest\_\_puffy\_bwstripesMost meshes have their materials under `localMaterialBuffer/materials`. However, some of them (especially those with physics) use `preloadLocalMaterialInstances` instead.You will (hopefully) see a material with three entries in `values` (order doesn't matter):
| Key | Value (DepotPath) |
| --------------- | --------------------------------------------------------------------------------------------------------------------- |
| MultilayerSetup | `base\characters\garment\citizen_casual\torso\t2_002_vest__puffy\textures\ml_t2_002_ma_vest__puffy_bwstripes.mlsetup` |
| MultilayerMask | `base\characters\garment\citizen_casual\torso\t2_002_vest__puffy\textures\ml_t2_002_ma_vest__puffy_default.mlmask` |
| GlobalNormal | `base\characters\garment\citizen_casual\torso\t2_002_vest__puffy\textures\t2_002_ma_vest__puffy_n01.xbm` |
We change the appearance by editing the **MultilayerSetup**:
1. 1.Find the file and add it to your project.
2. 2.Right-click the file and select "Convert to JSON".
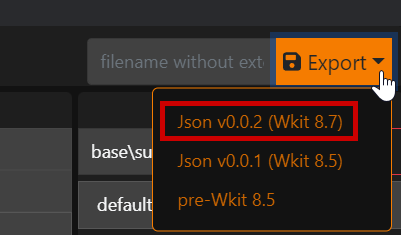
If you have set configured MLSB, you can make use of MlSetupBuilder's export feature, rather than doing it via WolvenKit:Move your new json file in the same folder as the multilayer setup.
The json file will be named `ml_t2_002_ma_vest__puffy_bwstripes.mlsetup.json` (`originalFileName.originalExtension.json`)
### Step 3: Editing the .mlsetup file
Open up MlSetupBuilder and load your .mlsetup.json file.If you select WolvenKit's "Open in File Explorer" option, you can copy the path from the explorer's address bar and paste it into the MlSetupBuilder's address bar.
If you want to see which layers correspond to which part of the mesh, you can load it from the library:
Optional: Find your mesh in the libraryThis step requires the tool to be [set up correctly](https://wiki.redmodding.org/cyberpunk-2077-modding/modding-know-how/modding-tools/mlsetup-builder), which is not part of this guide. Fortunately, it's also optional.Change the colours and materials to whatever you want.TBD: Create/link to material descriptionSave the file and overwrite the original `.mlsetup.json`:
If you have configured MLSB and had both files in the same folders, you will see a notification when the MlSetupBuilder has overwritten your original `*.mlsetup`. This takes a few seconds.Otherwise, you need to right-click on the json file under "raw" and select "import from JSON".This is already working. You can pack the project and see it work!
Since you haven't changed anything in the mesh itself, you can (and should) delete it from your mod. Only keep it if you want to do the steps below.
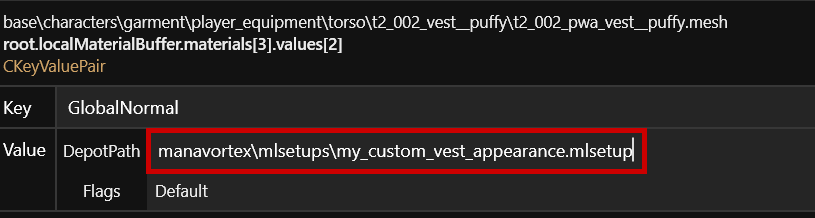
### Step 4 (optional): Custompathing
If you want to put up your own .mlsetup, rather than overwriting the original one, you can do that. All you have to do is changing the DepotPaths to the relative path of your mlsetup.
Keep your folder and file names unique! If you have two mods adding a file at the same location, the second one **will be unable to overwrite it** and will use the first mod's file.
### Step 5 (optional): Renaming materials
You can rename a material by changing the "name" property inside the CMeshMaterialEntry in the `materials` array:
Don't forget to look through all the appearances and change the `chunkMaterial` names!
---
# Agent Instructions
This documentation is published with GitBook. GitBook is the documentation platform designed so that both humans and AI agents can read, navigate, and reason over technical content effectively. Learn more at gitbook.com.
## Querying This Documentation
If you need additional information that is not directly available in this page, you can query the documentation dynamically by asking a question.
Perform an HTTP GET request on the current page URL with the `ask` query parameter, and the optional `goal` query parameter:
```
GET https://solaartw.gitbook.io/developer/documentation/generalized-guidees/recoloring-items.md?ask=&goal=
```
`ask` is the immediate question: it should be specific, self-contained, and written in natural language.
`goal` is optional and describes the broader end goal you are ultimately trying to accomplish on behalf of the user. GitBook uses it to tailor the answer towards what is most useful for that goal.
The response will contain a direct answer to the question and relevant excerpts and sources from the documentation.
Use this mechanism when the answer is not explicitly present in the current page, you need clarification or additional context, or you want to retrieve related documentation sections.